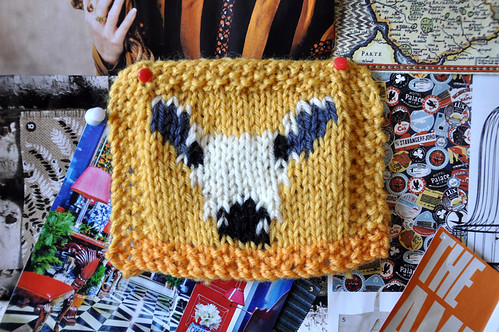
People seemed to like my intarsia portrait of my dog so as a weird piece of exam-studying procrastination, I thought I’d share how I use photos to make intarsia charts. I like to use regular old grids so I have to adjust the image from the start so my chart works with my gauge. Here’s how I do that plus a brief overview of how to make the charts.
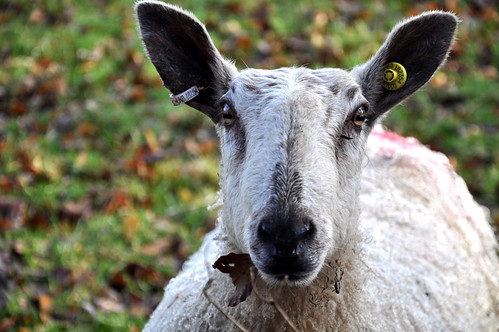
First you need to find yourself a photo to start with! Go get camera crazy. For this example, I’ll use a picture of a rather friendly sheep that lives near the Uni. If I take the picture as it is right now and apply a square grid to it and make a chart, my intarsia sheep will end up a bit squat.
Next you need to swatch with the yarn and needles you want to use. Measure your gauge. I have 5 stitches per inch and 6 rows per inch. My gauge isn’t square so I have to adjust something to make my chart turn out pretty. I find that it’s easier to adjust the image than it is to draw an elongated grid.
This is also when you should figure out where you’re putting your chart on your project and how big it should be, but I’ll come back to that.

Open up you photo in a photo editing program and find out the exact measurements of your picture. I use Photoshop and my sheep was 900 px by 598 px. From here it’s math time! The picture needs to be resized so it works with your both your gauge and a square grid. This usually means elongating the image. We’ll keep the width the same and adjust the height using the following formula: Image Height(Rows per in./Sts per in.) Round up to the nearest whole number. Here’s the sheepy math: 598(6/5) = approx. 718.
Resize the picture’s height. Make sure the width doesn’t change. To do this in Photoshop you need to have the “Constrain Proportion” box unchecked. The sheep is now 900 px by 718 px. The picture is ready to be traced to make an intarsia chart! Your options from here depend on what kind of software you have, but I’ll try to go over it briefly.
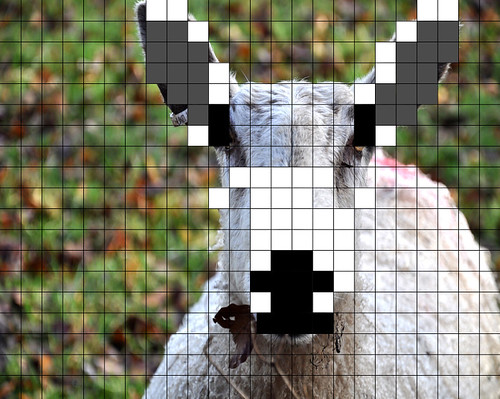
I make my charts by drawing over the image. The easiest way to do this is on a program that can draw simple shapes, and has a grid function. You can continue you to use Photoshop for this, but I prefer to switch over to Illustrator. I recommend Marnie MacLean’s tutorial for a more in depth explanation on how to make charts on Illustrator.
I’m going to try to keep things generic so this isn’t going to be super detailed. If it’s not already on, turn on your grid. You’ll need to resize your photo proportionally or adjust the scale of your grid with your gauge in mind so your intarsia fits on your project. I wanted a 3 inch sheep and I adjusted my grid so that it was about 15 squares across the sheep’s ears. This might take some fiddling to get just right.
Now you just need to trace your photo to make a chart! Draw squares of color using the grid as a guide to keep your squares in shape. If your program has a snap-to-grid function, it makes things a lot easier. Use your best judgment for color placement and keep in mind that you don’t have to follow the photo exactly. You might want to make things larger or omit details in order to make a more attractive chart.
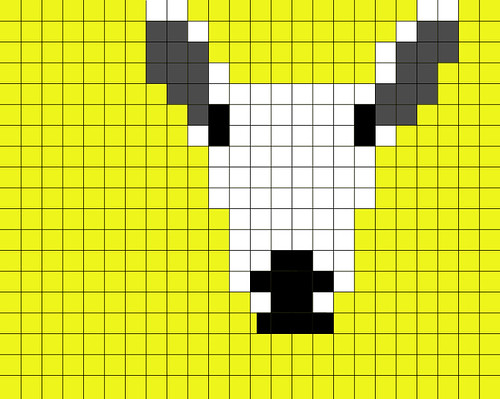
When you’re done filling in the image with little colored squares, remove the background photo or completely cover it. Your chart is done! Go knit.
If you don’t have a program that lets you play with grids and shapes, you can do this the old school way. Print out your resized picture. Layer a piece of regular graph paper on top of the picture. Use colored pencils or markers to trace the image by filling in the grid and create your chart. A light box would make this easier. You can also increase the contrast and saturation on your picture before printing it to make it easier to trace.
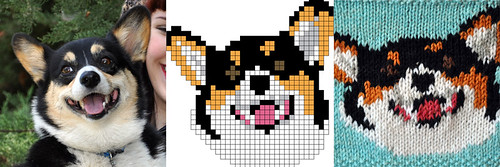
My Bean portrait is a better example of how a photo can be used to make a chart and it’s a warning as to why you should adjust the image to match your gauge before making a chart. I neglected to do that step and that’s why Bean looks a bit fatter than she actually is in the finished piece.
Leave a Reply