I’ve received a few questions on how I made my circle skirt so I thought I’d write a quick explanation on how I drafted a pattern for my skirt.
Materials:
A Ruler
A Measuring Tape
Old Newspaper
A Marker
A Pencil
Tape
First lay out your newspaper. I taped together a few sheets to get a big enough surface to fit half of my skirt.
Next, measure your waist with the measuring tape. This is going to be measurement C.
Find the radius (r) of your body by using this formula: C/2Pi
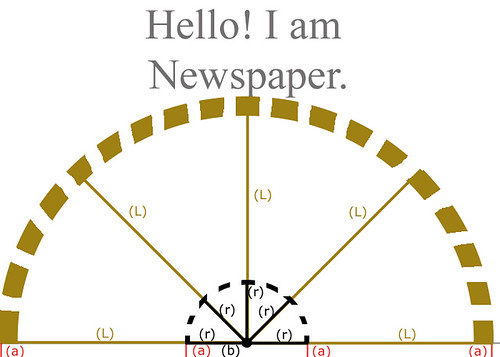
Figure out what you want your seam allowance to be (a). I used a half inch so that I could screw things up and fix them easily. In pencil, draw a line that is your seam allowance’s measurement away from the edge of your paper. With the marker, mark a point that is approximately at the center (b) on your seam allowance line. From that point, draw lines coming out at approximately 45 degree intervals that are the length of (r). Draw a half circle by connecting the ends of all of the radius lines. I free hand it which I’ve heard is difficult for most people (??), but my mom suggested the string method which never works for me. Basically you tie a string around your marker. You put the marker at the end of one of the radius points and holding the string taut, you tack the string down with your thumb or a push pin at the center mark (b). You maintain the tension in the string and swing it around. It should make a perfect half circle and connect all of the ends of the radius lines.
Next we need to sort out the length of your skirt. I usually just hold the ruler up my body and guess. A better plan would be to measure the length of a skirt that you know you like. Take that measurement and add some hem allowance to it. I gave myself 1/4 inch because I used bias tape to hem my skirt and didn’t need much hem allowance for that. Your measurement and the hem allowance give you the total length (L) that you need for your pattern. Add (L) and (r) together and make lines of that length coming out from the center point (b) at 45 degree intervals. I find that this is easier than drawing the (L) lines from the ends of the (r) lines. Connect the ends of the (L) lines as before with the (R) lines.
Cut out your paper skirt by cutting around the two half circle lines you made, cutting straight across the seam allowance (a) so that the edge of the paper remains intact. I fold this in half and average out the curves. I probably need to do this step because I draw your my freehand. The folded in half version will be 1/4 of your skirt and this is your pattern piece.
The next pattern piece you need to make is your waist band. It is a simple rectangle. The length should be (C)/2+2(a). Figure out how tall (t) you want your waist band. Mine is about 2 inches. To calculate what you want to cut, use this formula: 2(t) + 2(a). Draw your rectangle and cut it out.
This will give you all of your pattern pieces for a custom fitted circle skirt.
When you buy fabric, you will need 4(L+r) + 2(2(t) + 2(a)) with some extra fabric in case of mistakes. If you’re like me, you’ll probably just pull something out of the closet. Don’t pick a fabric that has direction to the print. You’ll need some bias tape if you want to hem your skirt the way I did and a zipper.
Anyways, you’ll need to cut two out of each piece. Cut the skirt piece along the fold of your fabric so that it opens up to be a half circle.
I sewed everything in this order. I sewed the two waist band pieces to the two skirt pieces. I ironed this seam up. Then I sewed up the right side of the skirt and waist band and I sewed up the left until the point where the zipper goes. I pressed my side seams open and folded the top of the waist band down the amount of seam allowance I gave myself (a) and ironed that in place. Then I folded the waist band in half and ironed it in place. I attached my zipper before I sewed that down, I think. I used Reader’s Digest Complete Guide to Sewing to figure out how to do that. I use the old crusty one. The new one really really really sucks. So I attached my zipper and sewed down the waist band. After that I did my hem by sewing bias tape to the edge and folding that up and sewing it down. I also used Reader’s Digest Complete Guide to Sewing for reference at this point.
I hope this helps you figure out how to draft your own circle skirt pattern.


Leave a Reply