This guide was previously published as an e-book called A Guide to Seamless Set-in Sleeve Sweaters in September 2014. It’s being rereleased for free as a resource because I am no longer selling patterns and products but continue to have requests for designs in this style.

Sweaters with seamless set-in sleeves are my favorite kind of sweaters to knit. Because there are no seams, the finishing work is minimal, but I can still achieve the flattering shape of a traditional set-in sleeve sweater. It’s truly the best of both worlds.
There are a few different ways to get the set-in sleeve look without the seaming, and using short rows is one of the best ways to do it. Short-row, set-in sleeves have more structure than other seamless methods because the technique requires you to pick up stitches from finished edges, which helps to add back in some of the structure that is lost when you eliminate seams. And because the short-row sleeve caps are added to the finished body instead of knit simultaneously, this method can be used to adapt seamed patterns without making too many changes to the original design.
This guide will help you learn how to design your own seamless, set-in sleeve sweater with short-row sleeve caps. It will first explain the general construction, and then it will walk you through the prep work and math needed to plan and knit your own sweater.
Construction Overview
The construction of top-down seamless sweaters with set-in sleeves is easy to describe but can be difficult to visualize. Although this style of sweater is knit in one piece, it’s easier to understand its construction by breaking the garment down into smaller parts. There are five basic parts to a sweater.
1. Upper Back. The back is the first part of the sweater that will be knit. It will be cast on and then worked down from the shoulders to the bottom of the armholes. Be sure to use a cast-on method that’s sturdy and doesn’t stretch too much. The long-tail and the cabled cast-on methods are both good choices. Starting with a wrong-side row, the upper back is knit evenly until only a few inches or a handful of centimeters remain where you’ll then work increases to shape the armholes. Once the piece is the length of the armhole depth, you can break your working yarn and place the stitches on scrap yarn or a stitch holder. If you plan on knitting a pullover, it’s important to end your back with a wrong-side row.
2. Upper Front. With the upper back completed, the upper fronts can be picked up and knit down from the cast-on edge. The cast-on edge will act as a fake seam and give structure to your sweater. To minimize how many ends will have to be woven in, the order in which you pick up the fronts will vary depending on if you’re knitting a cardigan or pullover.
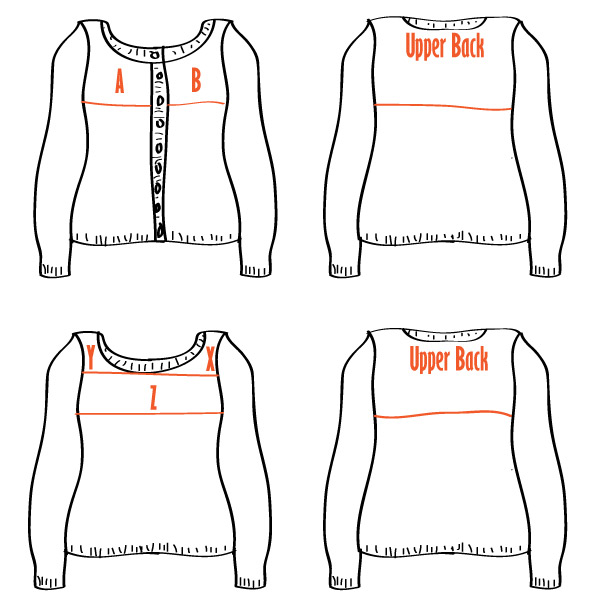
For a cardigan you first begin with the right upper front (A). Starting at the right corner of the cast-on edge of the upper back with the right side facing you, pick up and knit stitches. Next, if needed, this is the most convenient place to add short-row shaping so the sweater fits the natural slope of the wearer’s shoulders. The right upper front is knit down to match the length of the upper back, with neckline and armhole shaping worked simultaneously. When the right upper front of the cardigan is completed, the working yarn can be cut, and the stitches are placed on scrap yarn or a stitch holder. The upper fronts should end on the same row as the upper back, typically a wrong-side row.
The left upper front (B) on a cardigan is worked similarly. Leaving an opening for the neck, stitches are picked up along the cast-on edge, ending at the left top corner of the upper back. For a symmetrical cardigan, the left upper front should be worked so that the shoulder short rows, neckline shaping, and armhole shaping mirror the right upper front. When the left upper front is completed, leave the stitches on the needle and don’t cut the yarn.
For a pullover, the side that’s best to begin the upper fronts with is based on the row the neckline is joined on. If you plan on joining your neckline on a wrong-side row, pick up stitches in the same order as you would for a cardigan. If you plan on joining your neckline on a right-side row, start with the left front (X) by picking up and knitting stitches on the cast-on edge near the left side so you end at the left top corner of the upper back. Like on a cardigan, this is the most convenient place to add short-row shaping for the shoulders. Continue to knit and work the neckline shaping until the neckline is ready to be joined. Cut your yarn and place the stitches on scrap yarn or a stitch holder. Next, the right upper front (Y) is knit. Starting at the right corner of the cast-on edge of the upper back with the right side facing you, pick up and knit stitches. Shape and knit the right upper front to mirror the left upper front. When they match, knit across the right upper front, cast on any new stitches needed for the neckline, remove the left front from its scrap yarn and knit across it to join the front as one piece (Z). Knit the front down and work increases for armhole shaping to match the back. End with a wrong-side row. Keep the stitches on the needle, and don’t cut the yarn when the upper front is completed.
All of this may seem like fussy work, and that is true. It also might seem like it’d be easier to work from the bottom up so you don’t have to handle a bunch of separate little bits. That’s also true, but there’s a good reason to knit the body from the top down. Using this method, the sleeves will always be knit from the top down, and also knitting the body from the top down guarantees that the stitches and stitch patterns all run in the same direction. This means that all of the bottom edges will be bound-off edges instead of a mix of cast-on and bound-off. It’s a small detail on a relatively plain sweater, but it’s a significant one once you start playing with different stitch patterns and edgings.
3. Body. For both cardigans and pullovers, the front(s) and the back get joined when the underarm stitches are cast on. You’ll want to remove the scrap yarn and place all the pieces on your needles, and then work across using the single ball of yarn that’s still connected to the upper front or left upper front. A cardigan should be arranged so you work across the left front, cast on the underarm stitches, work across the back, cast on the underarm stitches, and then work across the right front. A pullover should be arranged so you work across the front, cast on the underarm stitches, work across the back, cast on the underarm stitches, and join the piece in the round. To simplify knitting a pullover, move the beginning of the round to the center of either underarm cast-on after the first round is worked. Although this isn’t a necessary step, it can make working side shaping and maintaining symmetry easier.
Some even rows/rounds are worked, and then waist shaping is incorporated. Shaping should begin at least an inch or three cm below the fullest part of the wearer’s bust. Where this point is varies from person to person, but 3-5 inches or 8-13 cm below the wearer’s underarm—not the sweater’s underarm—is a good estimate. For a fitted sweater, shaping should be evenly distributed over the rows/rounds between that point and the wearer’s waist. Shaping done in sets of four decreases is most common. The decreases can be placed in pairs at each side or as two darts in the front and two darts in the back. Knits typically have matching shaping on the front and back because knit fabric stretches and moves easily. Side shaping is the easiest to work because it’s easy to figure out the ideal placement for it, centered below the underarm cast-on edge. Vertical darts are more challenging because it’s quite noticeable if they’re in the wrong place on the front of the sweater. Front darts should line up with the wearer’s bust points.
Once the sweater has reached waist length, it’s time to add hip shaping for a full-length sweater. Increases for hip shaping are typically done in sets of four increases and can be placed like waist shaping. Most sweaters with side shaping for the waist will have side shaping for the hips, and similarly, most sweaters with waist darts will have hip darts. For a fitted sweater, hip shaping should start just below the waist, and the increase rows/rounds should be evenly distributed between that point and mid hip or the fullest point of the hip, depending on the sweater length. After that, rows/rounds are knit evenly until the sweater is the desired length, completing the body.
4. Sleeves. Stitches are picked up and knit evenly around the armhole, starting at the center of the underarm cast-on stitches and joined in the round. The cap is shaped with short rows. The first short row is knit from the beginning of the round to ¾-1 ½ inches or 2-4 cm past the center top of the sleeve cap. The sleeve cap is turned and then purled 1 ½-3 inches or 4-8 cm—¾-1 ½ inches or 2-4 cm past the center top in the opposite direction—establishing the top of the sleeve cap. From there, short rows are worked with each row one stitch longer than the last until you reach the top of the armhole shaping, ending with a wrong-side short row. This imitates the difference in height found in an eased-in, seamed sleeve cap. Some knitters prefer to work the short rows until they reach the stitches that were cast on for the underarm, but neither method exactly matches a seamed, set-in sleeve.
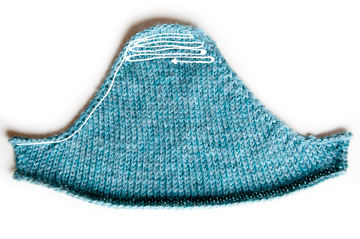
After the short rows are the correct length, turn your work, and knit to the end so the sleeve is ready to be worked in the round, and the sleeve cap is completed. In the first section after the sleeve cap is shaped, you will typically need to work some rapid decreases to get the upper arm the size you wish. The sleeve cap will often need more stitches around than you will want for the upper arm circumference, so they have to be decreased away at this point if they’re there.
Next, the sleeves are knit until they are the desired length with shaping evenly distributed down the length. Decreases are typically done in pairs down the inside of the sleeve.
5. Bands and Finishing. With the bulk of the knitting done, all that’s left is to add bands, weave in the ends, and block. Neck bands and button bands are added by picking up stitches. Buttonholes are typically evenly distributed. After that, with the finishing work completed, the sweater is all done!
Sketch and Swatch
Once you have the basic construction figured out, it’s time for the fun part—designing your sweater. You can start with a sketch and knit swatches to try to match it, or you can knit a swatch and draw a sketch based on it. When planning your design, there are a few important details to consider. Will it be a cardigan or a pullover? What will the neckline be like? Will there be waist and hip shaping? How long will the sleeves be? What edge treatment will you use at the sleeve cuffs and bottom band? What edge treatment will you use for the neck band and/or button bands?
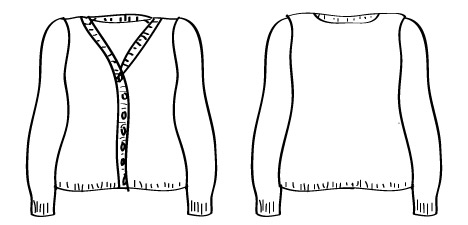
Once you have a plan, it’s time to knit more swatches to sort out the finer details. Swatch increases and decreases to decide on the best ones for your stitch pattern. Apply your edge treatments to your swatch to be sure that they’ll behave as anticipated. Work a few short rows to plan how you’ll incorporate them with your stitch pattern. All swatches should be washed and blocked. The first set of swatches help you plan the overall look, and this second set of swatches will help ensure that knitting the sweater design will go as smoothly as possible.
Taking the Wearer’s Measurements
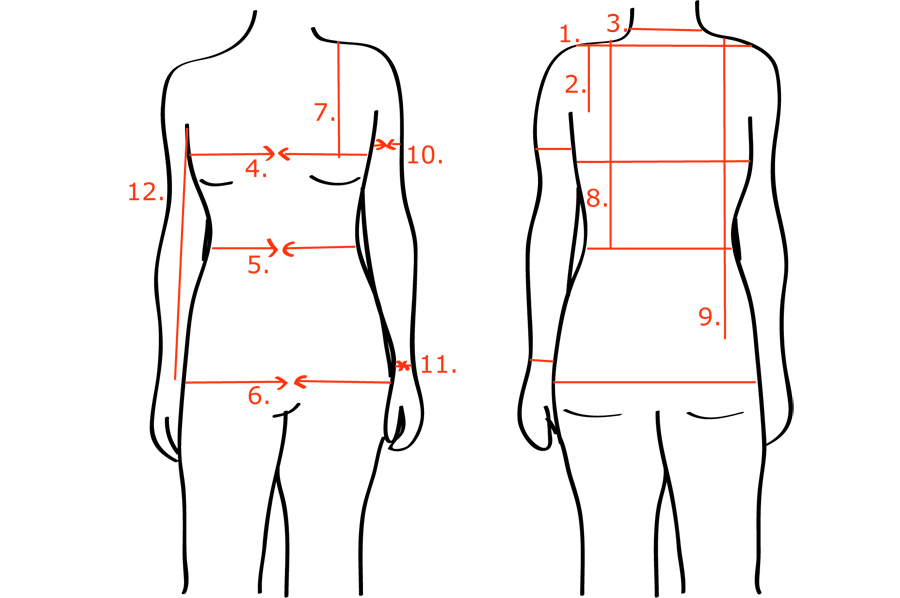
There are 12 essential measurements needed for designing a sweater. If you’re knitting for a specific person, the best thing to do is to measure them, but if not, you can find standard measurement charts online like the Crafty Yarn Council’s size charts or the ASTM standard tables of body measurements. Many of the measurements are taken from the back or with your arms relaxed, so if you’re knitting a sweater for yourself, find a friend to take your measurements for you. When taking vertical measurements, be sure that the measuring tape is completely perpendicular to the floor, and when taking horizontal measurements, make sure that the measuring tape is parallel to the floor. If the measuring tape is at an angle, the measurements won’t be accurate. For circumference measurements, wrap the measuring tape snugly, but don’t pull it so tight that it digs into the skin. To get good fit, it’s important to take the time to get accurate measurements.
1. Shoulder to Shoulder
2. Shoulder to Underarm
3. Back of Neck
4. Bust or Chest Circumference
5. Waist Circumference
6. Hip Circumference
7. Shoulder to Bust Point
8. Shoulder to Waist
9. Shoulder to Mid Hip
10. Upper Arm Circumference
11. Wrist Circumference
12. Underarm to Wrist
Planning the Sweater’s Measurements
Once you have the measurements that the sweater should fit, it’s time to figure out what the sweater’s measurements will be. Ease is added or subtracted, and this is where we start to transform the sweater design from a sketch into real numbers.
Ease is the difference between the garment’s measurements and the wearer’s measurements. A sweater with positive ease is bigger in circumference than the wearer, and a sweater with negative ease is smaller in circumference than the wearer. A sweater with zero ease has the same circumference as the wearer. Negative ease makes for a snug-fitting sweater, but knits are stretchy, so negative ease isn’t restrictive like you might imagine it to be. Fitted sweaters commonly have 1-3 inches or 2.7-7.5 cm of negative ease. Positive ease is less form-fitting, and tends to be drape more. For looser-fitting sweaters that aren’t oversized, 1-5 inches or 2.5-12 cm of positives ease is typical. When referring to the amount of ease a sweater has, usually the body of the sweater is being discussed. Different parts of a sweater should have different amounts of ease in order to allow you to move.
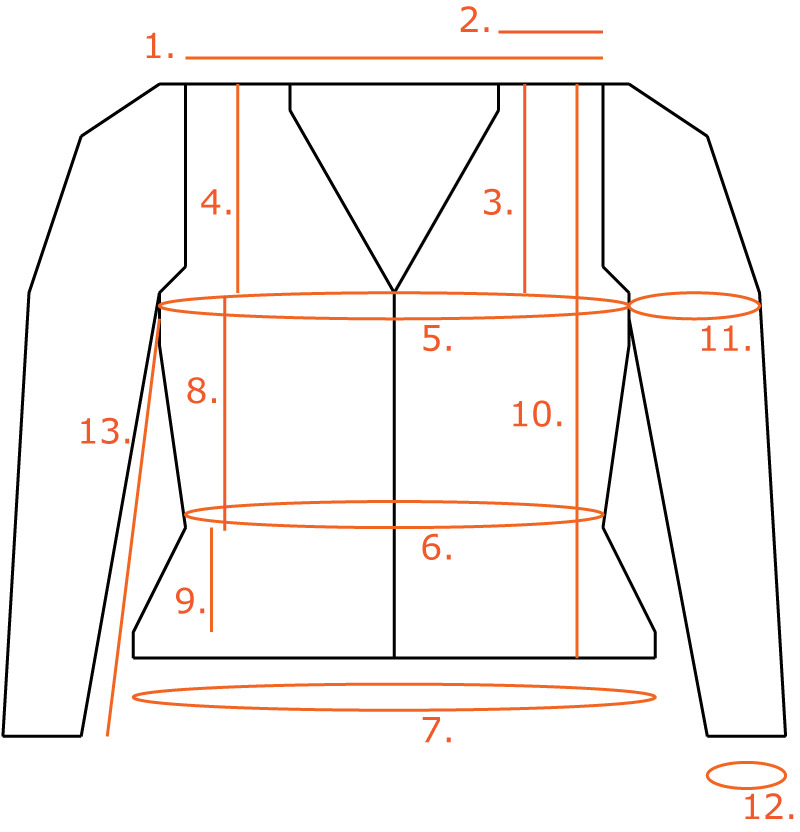
1. Upper Back. This measurement will typically match the shoulder-to-shoulder measurement from the previous section.
2. Shoulder Width. Subtract the back neck measurement from the shoulder-to-shoulder measurement and divide by two. This will give you your maximum shoulder width. You will want to subtract the width of any neck edge treatment you plan on using, and you may also wish to subtract some additional width to make a more open neckline.
3. Neckline Depth. This measurement is based on personal taste and your plan for your design. Don’t forget to subtract the depth of your neck edge treatment from this measurement.
4. Armhole Depth. Take the shoulder-to-underarm measurement and add 1-2 ½ inches or 2.5-6 cm to it. Armholes require some positive ease to allow easy movement and to keep the underarms of the sweater from getting soiled quickly, but with the short-row, set-in sleeves, you’ll get the best fit if the underarms aren’t too deep.
5. Bust Circumference. If you want the sweater to fit with negative ease through the bust, subtract 1-3 inches or 2.5-7.5 cm from the bust measurement. If you want the sweater to fit with positive ease through the bust, add 1-3 inches or 2.5-7.5 cm to the bust measurement. If you want the sweater to fit with zero ease, keep the bust measurement as it is.
6. Waist Circumference. The ease for the waist can be added or subtracted from the wearer’s measurements like the ease for the bust circumference for cropped sweaters, but for full-length sweaters, it’s often necessary to have positive ease through the waist to avoid issues with the hip shaping that are caused by increasing too rapidly over a small area.
Rapid shaping at the hip can distort the straight line of the bottom of a sweater, and it can cause hip “wings” on a open cardigan where the cardigan stands away from the body at the hips instead of falling with the body. This can also be prevented by adequately distributing the shaping using additional darts, but the easiest way to prevent this problem is to design a sweater with more ease through the waist. When calculating waist shaping for full-length sweaters, it sometimes works best to figure out how much hip shaping can be easily incorporated and then work backwards to get the sweater’s waist circumference.
7. Hip Circumference. If you want the sweater to fit with negative ease through the hips, subtract from the hip measurement. If you want the sweater to fit with positive ease through the hips, add to the hip measurement. If you want the sweater to fit with zero ease, keep the hip measurement as it is.
8. Armhole to Waist. Subtract the armhole depth from the shoulder-to-waist measurement.
9. Waist to Mid Hip. Subtract the armhole depth and the armhole-to-waist measurements from the shoulder-to-mid-hip measurement.
10. Total Length. This measurement is up to you. Use the shoulder to waist measurement and/or the shoulder-to-mid-hip measurement to help decide the perfect length or look at other garments.
11. Upper Arm Circumference. Take the wearer’s upper arm circumference and add, subtract, or leave it as is to get the sweater’s upper arm circumference. Many people strongly dislike negative ease through the upper arm of a sleeve because it can make both movement and layering difficult. Zero ease is a safer bet if you’d like a close-fitting sleeve. Some positive ease is what is most common for a sleeve. It allows for unrestricted movement, and it can be easily layered over shirts with sleeves.
12. Bottom Sleeve Circumference. For full-length sleeves, this would be the wrist circumference. For ¾-length sleeves, it would be mid-forearm. The bottom sleeve circumference can fit with positive ease so it doesn’t wrap tightly around the wrist or arm, with zero ease so it fits closely, or negative ease so it fits snugly. Add or subtract accordingly.
13. Sleeve Length. Take the underarm-to-wrist measurement and subtract the amount of ease you added to the armhole depth. If you’d like extra-long sleeves, add a few inches or cm here. If you plan on making ¾-length or short sleeves, adjust the length as desired.
Calculating the Top of Your Sweater
To start off the sweater, the upper back gets cast on and knit first, and our calculations begin with the most basic dimensions.
upper back width x stitch gauge = upper back stitches
armhole depth x row gauge = armhole depth rows
Next, it’s time to figure out the details like the armhole shaping.
bust x stitch gauge = bust stitches
(bust stitches / 2) – upper back width = underarm stitches
The armholes can be shaped by casting on a few stitches at a time over a handful of rows to create stair steps of cast-on stitches, or increases can be worked and then the rest of the stitches are cast on all at once.
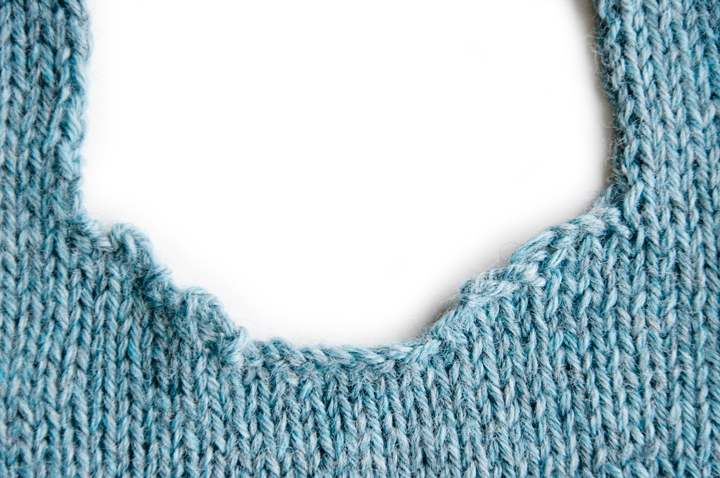
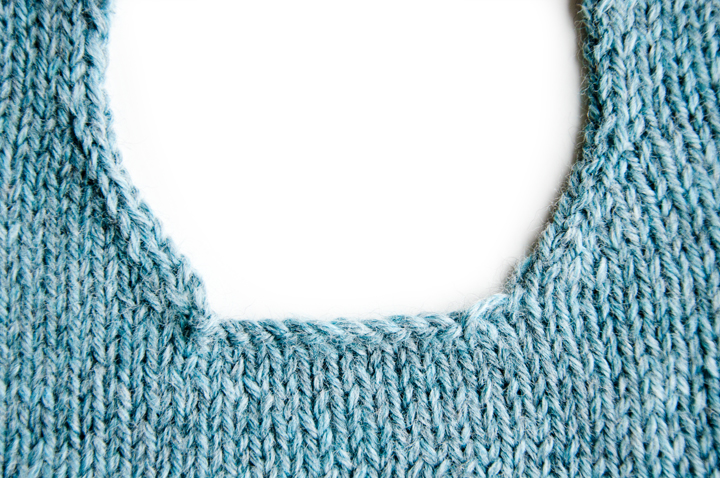
The stair-step method works best with finer-gauge knits, and I prefer the increase method for heavier-gauge knits. There isn’t a precise ratio for the number of stitches to be cast on at the bottom of the armhole vs. the number to be increased or stair-stepped. Generally, the shaping should all happen within the bottom 1-2 inches or 2.5-5 cm of the armhole depth, and at least an inch needs to be cast on at the bottom of the armhole. You will need to determine the best number of increase sets and cast-on stitches for your sweater to fit within those basic guidelines. When in doubt, experiment with some swatches to figure out the best choice for you.
armhole depth rows – increase rows = rows to be knit before increases
Now it’s time to move on to the upper front. The armhole depth and increase rows for the front will be the same as for the back, so they don’t need to be calculated a second time, but the shoulder and neckline shaping needs to be calculated. Most people don’t have perfectly square shoulders, so a short row or two directly after the shoulder stitches are picked up creates a better, more sloped fit. With heavier-gauge knits, one short row halfway across the shoulder generally will suffice, but more can be added.
shoulder width x stitch gauge = shoulder stitches
shoulder stitches / 2 = w&t point for short-row shoulder shaping
upper back stitches – shoulder stitches = new stitches needed for neckline
new stitches for neckline / 2 = stitches to be increased or cast on on each side
neckline depth x row gauge = neckline depth in row
stitches to be increased / neckline depth in rows = most basic increase rate for v-necks
Round necklines will be constructed much like the underarms. They can be shaped by casting on a few stitches at a time over a handful of rows to create stair steps of cast-on stitches, or increases can be worked and then the rest of the stitches are cast on all at once. The rate of increase will depend on the kind of curve you’re looking for. Once again, experiment with swatches if you’re uncertain about what will achieve the style you want.
V-necks are worked by increasing at a steady rate until you have the required number of new stitches. They look best when there is at least an inch or 3 cm of even knitting at the shoulders before the increases begin.
Depending on your desired neckline depth, you may have to work neckline shaping at the same time as the underarm shaping. Be careful not to neglect one or the other when planning your sweater fronts.
Since the underarm cast on had to be calculated earlier, this completes the top of your seamless sweater calculations.
Calculating Body Shaping
If you are including waist shaping in your sweater, it should start below the wearer’s bust point, which is generally at or slightly below the underarm.
(shoulders to bust point + 1 inch or 2.5 cm) x row gauge = total rows before waist shaping
total rows before waist shaping – armhole depth rows = rows after armhole to be knit before decreases
armhole to waist x row gauge = armhole to waist in rows
armhole to waist in rows – rows to be knit before decreases = decrease section
Once the area where the decreases go is established, it’s time to figure out how the decreases are distributed within that section.
waist circumference x stitch gauge = waist stitches
(bust stitches – waist stitches) / 4 = number of decrease sets
decrease section / number of decrease sets = decrease rate
If the decrease rate isn’t a whole number, round down to the nearest whole number.
decrease section – (decrease rate x number of decrease sets) = unshaped rows
The unshaped rows in the decrease section can be either placed before the decreases, after the decreases, divided evenly between before or after, or distributed amongst the decreases so the rate of decrease varies.
For a full-length sweater, the hip shaping needs to be calculated, if you are including it. The hip shaping is calculated similarly to the waist shaping, and it happens in the section between the waist and mid hip. Note that if you’re working hip shaping, you should avoid arranging your waist decrease rows so they’re directly before a hip increase row. Either arrange your waist decrease rate so that the decrease row is worked before the straight rows or plan for 1-2 inches or 2.5-5 cm of straight stockinette after the last decrease so there is a section of stockinette prior to the hip increase rows.
hip circumference x stitch gauge = hip stitches
waist to mid hip x row gauge = hip increase section
(hip stitches – waist stitches) / 4 = number of increase sets
hip increase section / number of increase sets = increase rate
After that, all that’s left is to knit any additional length and add an edge treatment. For a cropped sweater, omit the hip increase section from the final calculation.
total length x row gauge = total rows
total rows – armhole depth in rows – armhole to waist in rows – hip increase section = rows to be knit after shaping
Calculating the Sleeve Cap
To begin the sleeve cap, stitches have to be picked up around the armhole. I recommend picking up one stitch per stitch and one stitch per two rows. Picking up one stitch per two rows is an unusual ratio for knitting, but one stitch per two rows will make it so you have one row per row when working short rows.
Some methods will have you pick up the number of stitches needed for the upper arm instead of using a specific ratio. This does work in some instances, but it doesn’t work well for sleeves with close-fitted upper arms. Generally with that style, the armhole circumference will be larger than the upper arm circumference, and unless a significant amount of ease is added to the upper arm circumference, picking up stitches based on the upper arm number will cause the armhole to fit uncomfortably snugly. If you are planning a sweater with a looser-fitting sleeve and would like to use the same number of stitches for both the sleeve cap and upper arm, I’d suggest using the one-stitch-per-two-rows rate for the sleeve cap to plan the sweater’s upper arm circumference and working off of that instead of deciding on an upper arm circumference and trying to make it work for the sleeve cap.
Now that I’ve pointed out that picking up too few stitches will make an armhole too tight, you might be thinking that a more typical ratio of two stitches every three rows or three stitches every four rows would be the best choice. Although that sounds correct in theory, in practice it creates too much fabric because there will be more rows in the sleeve cap than the in armhole once the short rows have begun, creating a baggy sleeve cap. One stitch per two rows will make it so you have one row per row when working short rows, which is closer to a typical seamed sleeve cap.
armhole depth in rows + underarm stitches = sleeve cap stitches
Now that the number of stitches has been established, the short rows have to be distributed to create the right shape for the sleeve cap. The top of the sleeve cap should be approximately 1.5-3 inches or 4-7.5 cm wide.
top of sleeve cap width x stitch gauge = sleeve cap top stitches
(sleeve cap stitches / 2) + (sleeve cap top stitches/2) = stitches before first w&t
The second W&T will be after the sleeve cap top stitches have been purled, and every short row should be one stitch longer than the previous short row. Short rows can be worked to either the top of the armhole shaping or to the end of the armhole shaping, just before the cast-on stitches. The former will work well with both armhole shaping methods, but it can produce a slightly shorter sleeve cap than the latter will. Working short rows to the end of the armhole shaping doesn’t work well combined with the stair-step cast-on stitches method of armhole shaping.
Calculating Sleeve Shaping
With the sleeve cap complete, there will likely be more stitches than are needed for the upper arm. The extra stitches need to be decreased away directly after the sleeve cap, usually in sets of two decreases at the center of the inside of the sleeve. The decrease sets should happen within the first 1-2 inches or 2.5-5 cm after the sleeve cap, so a decrease rate of every other row is best, but it may be necessary to decrease on every row in order to achieve the right number of decreases in the ideal section.
upper arm circumference x stitch gauge = upper arm stitches
(sleeve cap stitches – upper arm stitches) / 2 = number of immediate decrease sets
number of immediate decrease sets x decrease rate = total immediate decrease rounds
The rest of the sleeve shaping is fairly straightforward. The decreases are evenly distributed in pairs along the inside of the sleeves.
bottom sleeve circumference x stitch gauge = bottom sleeve stitches
(upper arm stitches – bottom sleeve stitches) / 2 = number of decrease sets
sleeve length x round gauge = sleeve rounds
sleeve rounds – total immediate decrease rounds = sleeve decrease section
sleeve decrease section / number of decrease sets = sleeve decrease rate
Calculating the Button and Neck Bands
To calculate the stitches to be picked up for edgings, you’ll need the ratio for stitches per rows. Take your edging’s stitch gauge (X) and your main stitch pattern’s row gauge (Y) and reduce them to the lowest whole numbers to get your ideal pick up rate. You’ll want to pick up X stitches every Y rows to get the best button band. Many times, that will end up being 2 stitches for every 3 rows or 3 stitches for every 4 rows, but you might start to notice that it’s not always one or always the other. When picking up stitches from a horizontal edge, a ratio of one stitch per stitch is best.
You can simply pick up stitches using your ideal ratios without doing any math, but you can also calculate the number of stitches so you can plan buttonholes, collars, or other design features.
(total length in rows x stitches per row) x 2 + upper back stitches – (shoulder stitches x 2) = stitches for neck and button band on a v-neck cardigan
(neckline depth x stitches per row) + upper back stitches – (shoulder stitches x 2) = stitches for neck band on v-neck pullover
total length in rows x stitches per row = stitches for button band on each side of a round neck cardigan
(neckline depth x stitches per row) + neckline cast on + upper back stitches – (shoulder stitches x 2) = stitches for neck band on round neck
Adding Panels, Motifs, and Edgings
When adding more interesting elements to a sweater, planning in advance will make everything go more smoothly. For decorative panels or motifs like a cable panel or a lace motif, the key thing is to swap out inches or centimeters of stockinette with inches or centimeters of the panel. For example, if the stockinette gauge is 5 stitches per inch and the gauge for the cable panel is 7 stitches per inch, the difference in stitches per inch needs to be accommodated so the sweater ends up the correct size. 5 stitches of stockinette would be replaced with 7 stitches of cable.
Deep bands at the bottom of a sweater or deep cuffs on sleeves also need to be planned for. Cuffs should be subtracted from the sleeve length before the decreases are distributed. Similarly, a deep band on a sweater should be subtracted from the sweater body’s total length. For a cropped sweater, the band should be subtracted from the length before the waist decreases are distributed. On a full-length sweater, the bottom band may need to be planned before the hip shaping is calculated, depending on the length.
This guide was previously published as an e-book. It’s being rereleased for free as a resource, but no support will be provided. Please direct any questions to communities such as on Ravelry or Reddit.
Leave a Reply