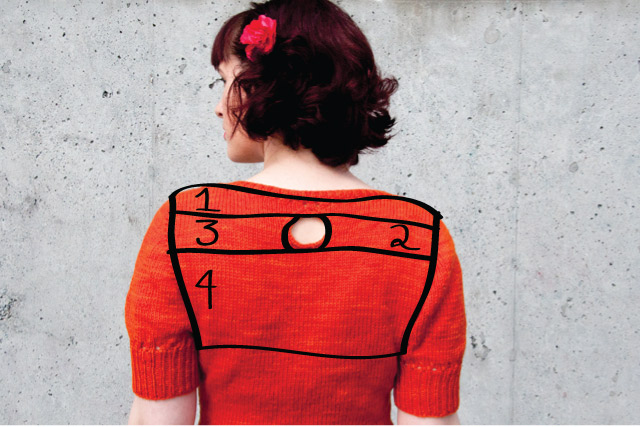
Knitting Myrna’s Upper Back

OAL_Myrna_Back

The hardest thing about my favorite construction method is visualizing how everything comes together in the beginning. It can be difficult to trust that everything is going to work out if you can’t imagine how the pieces work. To start off Myrna, you first knit the upper back. Because of the keyhole, there are four sections to the upper back. There’s the beginning of the upper back, the right side of the keyhole, the left side of the keyhole, and then the rest of the length of the upper back.
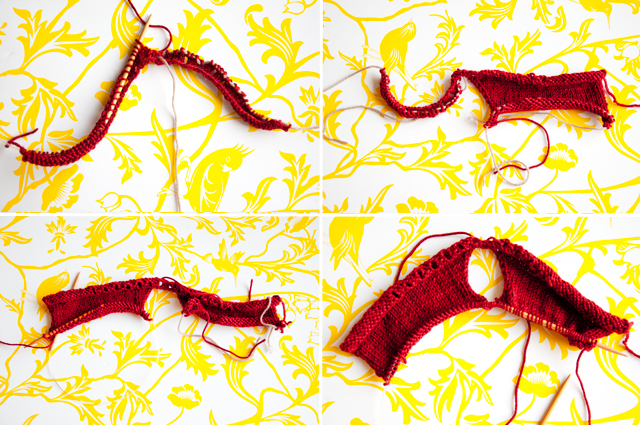
OAL_Myrna_Keyhole_steps

It will look like this as all of the sections come together. Easy enough, right? What’s even easier is to leave out the keyhole detail. If you’d like to omit it, all you have to do is work 18 rows of stockinette and skip past both keyhole sections to Row 2 of “Upper Back Cont.”
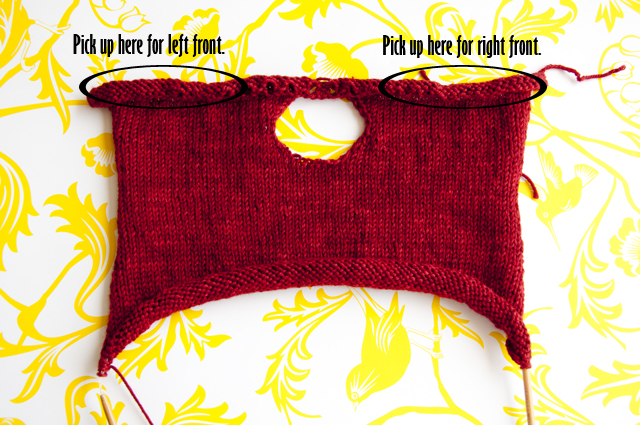
OAL_Myrna_Back_Completed

When your upper back is completed, put it on scrap yarn. Now you’re ready to move on to the upper fronts. They’re both picked up and knit from the cast on edge, and they’re pretty straight forward to knit.


Posted

in

by

Tags:

Comments

17 responses to “Knitting Myrna’s Upper Back”

  1. erinalter

    woohoo! i am excited!

  2. .. and turn your picture upside down as that is how the work appears on the needles to confuse even more! I’m just about to cast on now!

  3. deborah griffis

    I’ve already purchased this pattern and I can’t wait to start mine!

  4. Wow this is so cool!

  5. Nicki

    OK my keyhole looks a little funny,, but I can live with it 🙂 I’m seeing this as a learning experience and if it is a wearable one so much the better! My tension was all over the place for a while there, think that is the problem. I probably should have gone for the plain back but I like a challenge.

    1. The keyholes have an edging, so it’s okay if it looks a little messy at this point.

      1. Nicki

        Good to know, thanks!

  6. Savage Tribal

    Thanks very much – I’ve got past the keyhole part, it was interesting. I’m glad mine seems to be the same shape as yours – I’ve never done top down before and when I cast on 70 stitches I was thinking oh, this is way bigger than anybody’s neck and trying to imagine how it would all come together. But now I’m further down it, I can see how it’s working out.

    I like the little eyelets as well – the whole pattern has been fun so far, with a bit of decreasing, increasing and yo to break up the plain knitting.

  7. Potentially dumb question, but what does “put it on scrap yarn” mean? I’m thinking it means to thread leftover yarn through the end loops so things don’t ravel. Also, I love the visual on top – really helps to see how it breaks down!

    1. Yep! You thread a bit of scrap yarn through the ends loops so you can use your needles without having stitches unravel. It puts the stitches temporarily on hold. You can see in the set of four pictures for the keyhole, the taupe yarn is being used as scrap yarn in the first three pictures, and in the fourth, I’ve removed it and put everything back on my needles.

      1. Got it! Thanks. 🙂

        1. This one helped me, too (first sweater). Thanks 🙂

  8. Sharon Robinson

    I am so enjoying knitting this the pattern is easy to follow and not a boring knit as there is always something going on.

  9. I’m joining the OAL, but this was the first time it occurred to me to check out your website! Doh! Thanks for this post, because I wasn’t sure where to pick up the stitches, but I’m glad to know that I did it correctly.

    I’ve made your Miette cardigan before, my first cardigan. I’ve only made simple scarves before, and I love the Miette! The Miette’s construction is different than the rest of your patterns, so I was scared to try them. After starting on the Myrna, I think it’s a great gateway to your other patterns. 🙂

  10. Help please Andi. I’m about to start the Left Upper Front and I’m confused about picking up stitches because if I count 38 from the RH edge it doesn’t seem close enough. Can I count 13 stitches from the left hand side and pick up from there? Would that be right? Thanks

    1. That’ll work! The important thing is to have the left front lines up with the left edge of the back once you have all of your stitches picked up.

  11. Yay, it worked! Thank you.

Leave a Reply

Your email address will not be published. Required fields are marked *

This site uses Akismet to reduce spam. Learn how your comment data is processed.